Japanese secret cooked-dough bread (????)
Ingredients
TangZhong or Starter
- 10 Tbsp Water at 30°C
- 2 Tbsp Bread Flour
Activator
- 85 ml Water
- 6 g active dry yeast
Wet Ingredients
- Activator of water and yeast as above
- 30 g egg
- 84 g Tangzhong or starter measured from starter made above
Dry Ingredients
- 210 g bread flour or high gluten flour
- 56 g biscuit/cake flour or low gluten flour or even corn flour if you like very soft
- 1/2 teaspoon salt
- 42 g sugar
- 20 g milk powder
- Softener
- 22 g butter
Instructions
- For the activator, add yeast to water at room temperature, and set aside for 5 minutes.
- Cook the starter by adding flour to water, and then bring it to 65°C, set aside to cool to 7°C. Use this as a wet ingredient later.
- Add all the wet ingredients and the starter to the activator and mix well.
- Mix in all the dry ingredients, then bring the mixture together. If using a machine, keep the temperature low by using cool wet and dry ingredient.
- Knead for 6 minutes, ensuring the dough's temperature does not increase above 28°C. If you use your hands, you should not need any flour and your hands, the table and the bowl should all be clean.
- Mix in the butter and knead for another 2 minutes.
- Proof for 40 minutes at 28°C.
- Cut into bun size, either 30g each for small buns or 60g for normal commercial sized ones., proof for another 30 minutes.
- Shape and incorporate whatever fillings and toppings desired.
- Proof in a warmer environment at 38°C.
- Bake at 200°C for 12 minutes until the bottoms of the buns are 2/3 golden brown in color.
63°C or 145°F is a magic number in the culinary world. That is the temperature you cook pork, creamy eggs and medium beef. But at 65°C, the gluten in the bread flour and water mixture absorb moisture and become leavened. It makes breads pillowy, soft and moist. That’s a secret Japanese has kept from the world for decades and revealed to the world by Yvonne Chen (陳郁芬) in her book, 65°C湯種麵包 about 12 years ago.


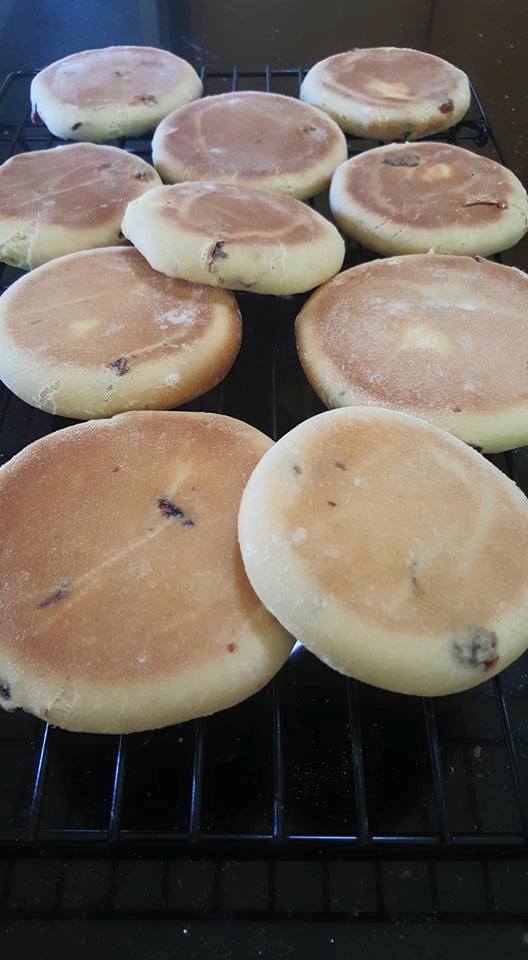
Check that the bread is well baked: 2/3 of the bottom should be golden brown.

Cinnamon rolls made using this recipe are soft and melt in the mouth.
Here is her book and if you are fortunate to get it, it opens a new world of bread baking for you:

65 degree Bread Doctor
Bread Technicalities
- Starter. The starter or 汤穜 must be mixed before bringing it to 65°C and then cooled to 7°C before use.
- Activator. When mixing the activator, always ensure the water temperature is around 30°C, and not higher when adding yeast to it.
- Kneading. When kneading, you should not need to add flour to the mixture. As the gluten forms, it becomes elastic and shiny and will stick up all the flour. Turn the bowl upside down after taking the dough out to prevent the bits on the bowl from drying up. We call it 三光。Three things clean: hands, table and bowl. The temperature is best kept between 24°C and 26°C
- Machine Knead. If kneading with a machine, the temperature increases because of friction. Therefore, knead long on a low speed and short on high speed. Use cold wet ingredients and refrigerate the dry ingredients with the bowl prior to mixing.
- Gluten Test. The windowpane test is important and always do that to ensure gluten is well formed.
- Proof 1. The first proofing done at 28°C takes 40 minutes. This is the optimum proofing temperature. For every decrease in temperature by 1°C, increase the proofing time by five minutes. Do not proof higher than 28°C if possible. You will know if the dough is ready if you poke your index finger deep into the dough and it leaves a hole and not retract back. You have overproven your bread when instead of leaving a hole, it punctures like a balloon.
- Shaping. Always cover the pre-shaped and post-shaped bread with a cling wrap or wet cloth to prevent the bread from drying out. This is perhaps the most important part that most people miss out. Your bread can never be soft if the dough is allowed to become dry.
- Proof 2. Spray some water onto the surface of the shaped bread to keep it moist. To test if the second proofing (done after shaping) is completed, touch it with a finger dipped in flour. If a dent can be formed with a light touch, it is ready. Normally about 30 minutes at 28°C. Further proofing may cause it to deflate.
- Baking. The higher the temperature, the quicker the bread browns and cooks, the softer the bread will be. The lower the temperature, the bread turns harder and takes longer to cook. Every oven is different, and some experimentation might be needed. Generally for my oven, I use 210°C and 9 minutes for small breads and 190°C and 15 minutes for loaves. You will know the bread is cooked if the bread sounds hollow when you tap its bottom for loaves. For small breads, check that 2/3 of the bottom and the sides are lightly browned. For bridal loaves, check that the ‘waist’ of the bread is baked till golden brown.
Ingredients
10 Tbsp Water at 30°C
2 Tbsp Bread Flour
85ml Water
6g active dry yeast
Activator of water and yeast (as above)
30g egg
84g Tangzhong or starter (measured from starter made above)
210g bread flour or high gluten flour
56g biscuit/cake flour or low gluten flour or even corn flour if you like (very soft)
1/2 teaspoon salt
42g sugar
20g milk powder
22g butter
Method
- For the activator, add yeast to water at room temperature, and set aside for 5 minutes.
- Cook the starter by adding flour to water, and then bring it to 65°C, set aside to cool to 7°C. Use this as a wet ingredient later.
- Add all the wet ingredients and the starter to the activator and mix well.
- Mix in all the dry ingredients, then bring the mixture together. If using a machine, keep the temperature low by using cool wet and dry ingredient.
- Knead for 6 minutes, ensuring the dough’s temperature does not increase above 28°C. If you use your hands, you should not need any flour and your hands, the table and the bowl should all be clean.
- Mix in the butter and knead for another 2 minutes.
- Proof for 40 minutes at 28°C.
- Cut into bun size, either 30g each for small buns or 60g for normal commercial sized ones., proof for another 30 minutes.
- Shape and incorporate whatever fillings and toppings desired.
- Proof in a warmer environment at 38°C.
- Bake at 200°C for 12 minutes until the bottoms of the buns are 2/3 golden brown in color.
- Mix the bread flour and water in the Thermomix, and bring it to 65°C, refrigerate.
- Combine wet ingredients, and add to the cooled starter in the Thermomix.
- Combine dry ingredients and add to Thermomix.
- Using knead function, knead at Speed 3 for 6 minutes.
- Add the butter and knead another 4 minutes.
- Rest dough at 28°C for 40 minutes.
- Shape and incorporate whatever fillings and toppings desired.
- Proof in a warmer environment at 38°C.
- Bake at 200°C for 12 minutes until the bottoms of the buns are 2/3 golden brown in color.
How the guru and author herself (Yvonne Chen) makes this bread is in this video. I have more or less documented everything she has said. Have fun baking!